Docker images and containers

One of the key components in the containerization process is an Image. Building an image is a mandatory step in your journey towards creating a container.
Fortunately, Docker Desktop makes it quite easy to build an image from a Dockerfile. These images can also be stored in a central repository that anyone can use to build their application on top of your image.
What is a Docker Image?
A Docker image is a template with multiple layers that contains instructions for creating a Docker container. These instructions are described in the Dockerfile.
Typically, these images include all elements such as code, configuration files, libraries, environment variables, etc., necessary to run a containerized application. They must first be deployed to a Docker environment to be executed as a container. The docker run command is used to create a container from an image.
A Docker image is reusable and can be used on multiple host systems. Another interesting feature of a Docker image is its immutability, or in other words, it is read-only. However, images can be duplicated, shared with other systems, or even deleted. The immutability property is useful for testing new applications as it protects the base image from any malicious changes. The original image will always remain intact and can be used an unlimited number of times.
How does a Docker image differ from a container?
A container can be defined as an active instance of an image. It can also be defined as a standard unit of an application containing all the necessary executable files and configuration files required to run the application. Containers can share their own resources and access resources from other containers. A Command Line Interface is used to start, execute, stop, move, and delete a container.
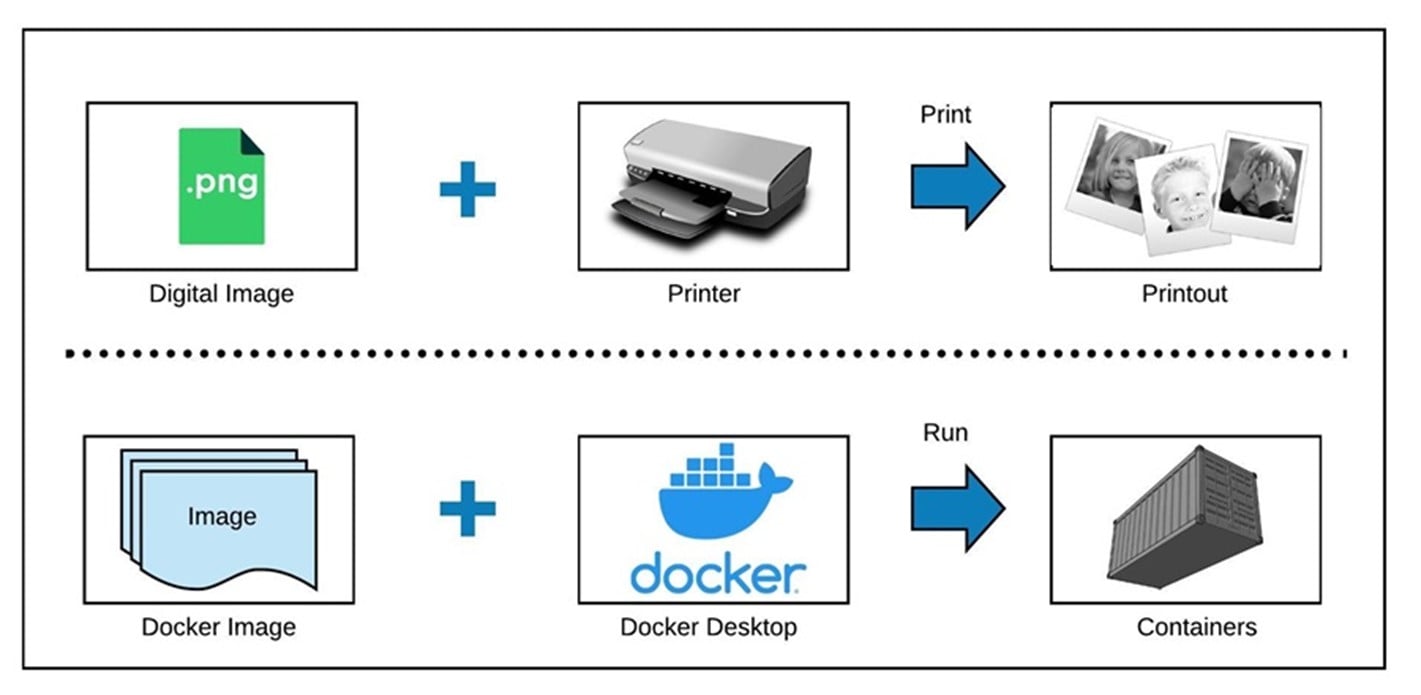
Let's understand the difference between an image and a container using a simple analogy. Imagine you need a family photo to hang on your wall. Luckily, you have the digital photo saved on your laptop. This digital photo is sent to a printer to generate the print of the image. Ultimately, the print is the actual usable form that meets your requirements, not the digital image. Here, the printer represents Docker Desktop, the print is the container, and the digital image is the Docker image. The Docker image is converted into a container using Docker Desktop.

Multiple layers of Docker images
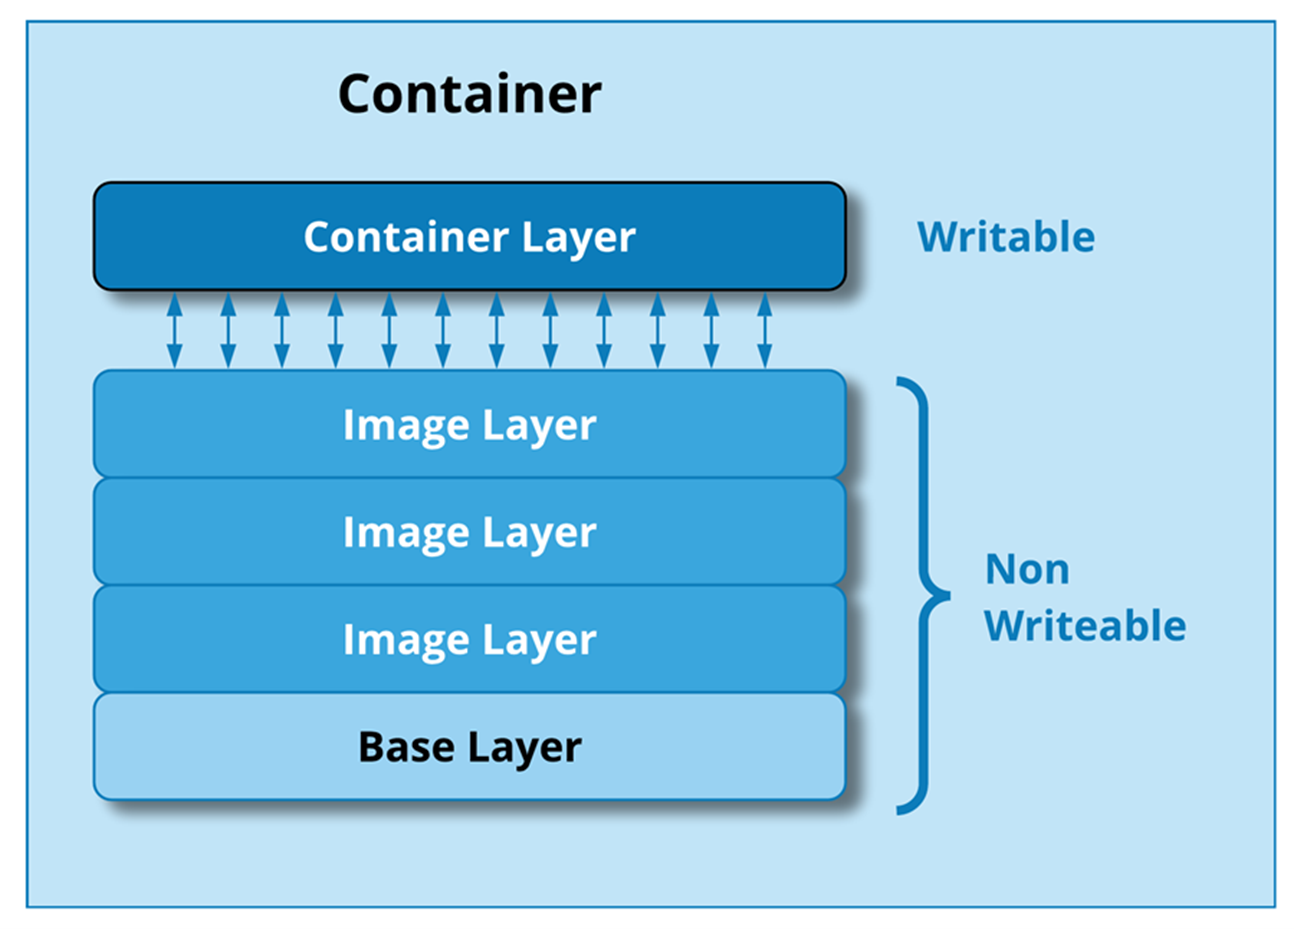
A Docker image is typically composed of multiple layers. An image often starts with a base layer. On top of the base layer, other layers are added one by one. These intermediate layers are cached to ensure that you can easily access the upper layers. Each time a container is created, a writable layer is also created. This layer is known as the container layer and stores all changes made to the running container. It can store new files, modify existing files, and keep track of data from newly deleted files. Importantly, all changes made to the container layer are stored only on that layer. The container layers allow many containers to share the same underlying images with their own data on top.

How do you create a Docker image?
The following excerpt shows the Dockerfile using some popular commands and saved without an extension.

Once this is done, the next step is to convert it into an image. You can execute the following command from the directory where the Dockerfile is located in your Docker Desktop Command Line Interface (CLI):
docker build -t partech .
The "-t" command specifies the name of the image (partech) here. Optionally, you can also use a username and tag the image in the format <username>/<imagename>:<tag>. Once this is done, you can always verify if your image has been created using the command:
docker images
This will display details about the image you just created.
The next step is to create the container. Always remember that an image is just a template. Your task isn't complete by building an image. Ultimately, we need a container. To convert an image into a container, you need to execute the following:
docker run -d --name mycontainer partech
In the above command, the container is created in detached mode. Here, "mycontainer" is the name of the container, while "partech" is the name of the image we are running.
The output will be the container ID. You might be wondering where we got this output from. Remember our Dockerfile and the CMD command that provided instructions to display this text once the container runs successfully.
How to pull an image and push it?
Pushing an image is the process of uploading a Docker image to the Docker registry. Remember, the Docker image you created still resides on your local machine and cannot be used elsewhere. To make this possible, you need to push it to a Docker registry that hosts Docker images accessible to everyone.
One of the commonly used Docker registries is Docker Hub. To use Docker Hub, you need to create an account, log in, and create a repository before pushing an image.

Next, you need to log in to Docker Hub via the Command-Line:

After successfully logging in, you should use the push command as shown below to complete the process:

Pulling an image is exactly the opposite of pushing. You fetch an image from the Docker registry for your own use. This is achieved using the command below:

In the above command, the official Ubuntu image is pulled from the Docker registry, allowing you to make your own modifications on top of the image without affecting the base image stored in the registry.
Conclusion
In this post, we have successfully created a Docker image from a Dockerfile and also pushed it to the Docker repository. Additionally, you now understand the difference between an image and a container. In the next post, we will discuss Docker Swarm, a container orchestration tool that allows you to easily manage multiple containers.